Let's Encrypt is a nonprofit certificate authority that makes it easy and free to get an SSL certificate for your website. The goal of the project is to have as many websites as possible using https, promoting encryption and privacy as the norm across the web. I use Let's Encrypt certificates on my own websites.
My hosting provider (GoDaddy) does not offer support for Let's Encrypt. This instruction page is to help those in a similar situation take advantage of a free Let's Encrypt certificate.
I started out using a 3rd-party website to generate my certs. That site changed ownership and started issuing its own certs in place of Let's Encrypt, prompting me to figure out how to do it myself. These instructions are the result of an afternoon of tinkering.
Executive Summary: I created an Ubuntu VM, installed CertBot on it, used a CertBot command to generate my certificate locally, and then installed that certificate in my hosting provider's cPanel interface.
I run Windows at home. EFF's CertBot utility only runs on UNIX-like operating systems. If you don't already have such a system around, the easiest way to get one is by creating a virtual machine. I already happened to have VMWare Workstation Player installed, as I run some old Delphi environments on it. I went to Ubuntu.com, downloaded the latest desktop iso, and created a new VM. Use whatever virtual machine software and 'nix distro that you prefer. Oracle's VirtualBox is another popular VM tool.
Using the Ubuntu Software management app, I searched for CertBot and installed it. Using Ubuntu's Text Editor program, I created the default CertBot config file, /etc/letsencrypt/cli.ini. I added the following entries so I wouldn't have to supply them each time I use the program (use your actual email address):
email = me@example.com
rsa-key-size = 4096
preferred-challenges = http
Unless you started the text editor with elevated rights, you may not be able to save the file directly to the final destination. If so, just save it in your home directory and move it there.
The default key size is 2048. My previous certs were 4096, so I wanted to keep it the same.
The http challenge uses a little file uploaded to your server to prove that you are the webmaster of the domain. If the verification process is able to download the file and it contains the expected data, you are assumed to be who you say you are.
Wildcard certificates require the use of the dns challenge, which I do not cover here.
Open the Terminal application. It will most likely start you in your home directory (~$), which is fine. Type the following command to launch CertBot, substituting your actual domain name in place of example.com:
sudo certbot certonly --manual -d example.com,www.example.com
The use of sudo should prompt you for your password if you haven't already done so recently.
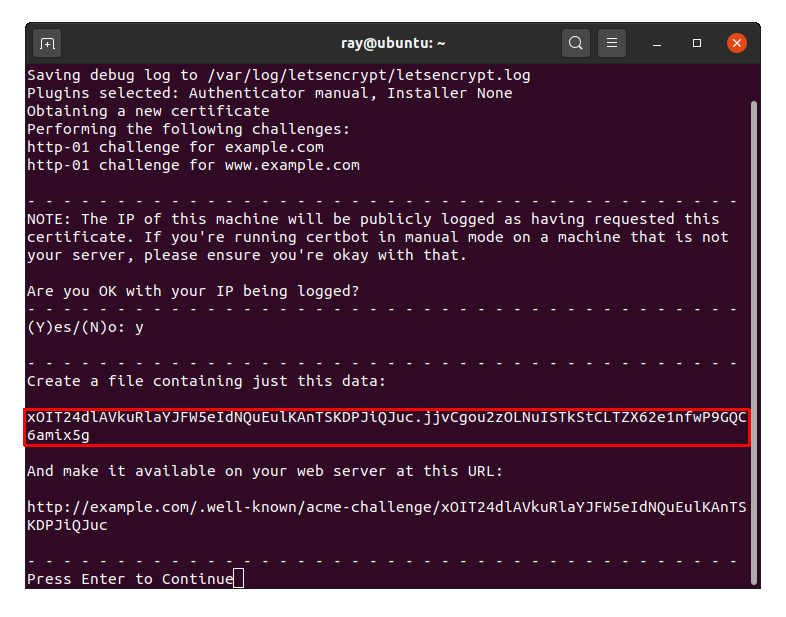
Answer (Y)es to the prompt asking if you are OK with your IP being logged.
Pause for a moment and review the on-screen text. Don't press Enter yet!

The above file creation and upload steps will be repeated for the "www" version of your domain.
Once both files have been verified, your certificate will be generated. The certificate files are saved in the /etc/letsencrypt/live/example.com/ directory. I found it handy to bookmark this folder.
You may delete the little challenge files from your home directory and website as they are no longer needed.
I use the .htaccess file on my site to redirect all traffic to https and add the "www." if not already there. If you aren't doing any rewrites or redirection like that, you don't need to bother with this part.
The http challenge needs to use http and the non-www hostname, so I added the following exception just before each of those RewriteRule entries:
RewriteCond %{REQUEST_URI} !\.well\-known
This says to only apply the forthcoming RewriteRule if the request DOES NOT contain the text ".well-known" (the exclamation point is the NOT, backslashes escape special characters). This works for any special files under that directory, not just the http challenge.
Here is the entire section that redirects traffic to https. I also make exceptions for robots.txt and 403.shtml:
# Force https (except on certain files)
RewriteCond %{SERVER_PORT} 80
RewriteCond %{REQUEST_FILENAME} !403\.shtml$
RewriteCond %{REQUEST_FILENAME} !robots\.txt$
RewriteCond %{REQUEST_URI} !\.well\-known
RewriteRule ^ "https\:\/\/%{HTTP_HOST}%{REQUEST_URI}" [R=301,L]
My hosting provider supplies cPanel to handle website configuration.
You should now be ready to browse your site using https! Click on the padlock icon next to the url in your browser. Viewing the details should show that your certificate was issued by Let's Encrypt and has an expriation date 90 days in the future.
Let's Encrypt certificates are good for 90 days. If I were using CertBot in its intended design of running directly on my web server, the renewal process could be automated. Because my hosting provider doesn't support that, I must renew manually.
I make an entry in my calendar for a Saturday about 60 days in the future to remind me to renew my certificates. Renewing after 60 days allows for a little breathing room if I am unable to do so as planned, such as being out of town for a weekend.
To renew, simply repeat the above process from the Generate a Certificate step. After verification, the fullchain.pem file will be overwritten with the new certificate. The certificate install steps are exactly the same.